Everything is a high/low project: Part One

One of my favorite shows on HGTV was (is? if it’s still on and I just never come across it) Sabrina Soto’s high/low project. This is my general rule for all home decor purchases, so it was nice to see HGTV highlight the reality that we can’t all spend $1000 on an end table. It does take a little more work, thus the term “bargain hunting”, but when you calculate your savings, you’ll learn it was well worth it. The other piece of it is to not sacrifice quality as a result. For this, I follow two rules: 1. When you have a choice, choose real wood 2. Read reviews and ignore the minority reviewer(s) who doesn’t know how to put furniture together.

Living Room

low project

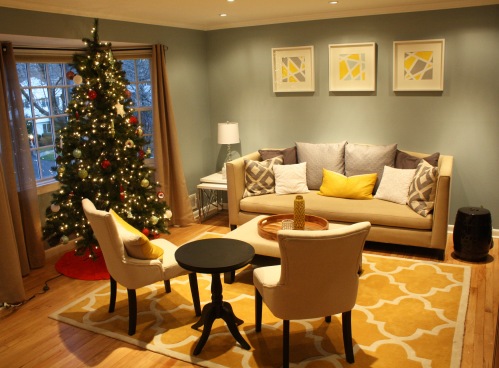
low// Morroccan stool $39.99 @ Home Goods | upholstered chairs (set of 2) $243.99 @ Overstock.com | moroccan trellis rug (gold) $242.24 @ Overstock.com | Lamp $39.99 @ TJ Maxx | nesting tables $129.99 @ Overstock.com

As you can see, Overstock is a great resource for getting look-a-likes on the cheap. Occasionally, they’re not even copycats since a few items in the room are Safavieh and Ethan Allen pieces. On a regular (almost-weekly) basis, Overstock sends their customers 10%-15% off coupons. They also offer 5% back for club O members, which allows customers to use a trial but otherwise pays for itself after a few purchases. However, their prices also do go up and down and items do disappear, so keep items on your wishlist or save for later and keep an eye on it!

high// Bubbles Ceramic Side Table $103 @ West Elm

high// Hayes Tufted Chair $399 (each) @ Pottery Barn

high// Fretwork Dhurrie Rug  $859 @ Ethan Allen

high// Windham Table Lamp  $599 @ Ethan Allen

high/ Box Frame Nesting Table $239 @ West Elm

Living Room High: $2200 | Living Room Low: $700

Dining Room 

After

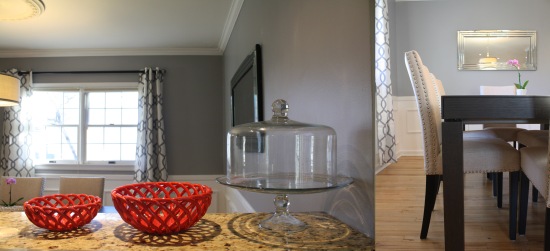
low// Pendant Lamp  $149.99 @ Home Depot | Nailhead Dining Chairs (set of 2) $183.89 @ Overstock.com | Beveled Mirror $79.99 @ Home Goods | Trellis Curtains (Set of 2 Panels) $19.99 | Saddle Stools (Set of 2) $84.63 @ Overstock.com

The funny thing about bargain hunting is you often lose sight of how much you’re spending, because everything around you is a bargain. For example, we were so reluctant to buy this lamp because it was basically the most expensive lamp at the store. But the thing we forgot was that it was still a fraction of what something similar may cost at a lighting store and was still serving the purpose – providing light! We almost went with a lamp that was more than half the price at $69.99, but it was in a burlap and missing the stripe, which in hindsight would have darkened the room significantly. So i’ll repeat it again, it’s an investment into your everyday needs! Even after realizing the value in it, we still found ourselves in the same place with other lighting purchases.

high// Small Meurice Pendant Lamp $550 @ Jonathan Adler

high// Hudson Camelback Upholstered Side Chair $229 @ Restoration Hardware

high// Astor Mirror $299 @ Pottery Barn

high// Kendra Trellis Drape $84 (per panel) @ Pottery Barn

high// Tibetan Bar Stool $99 (each) @ Pottery Barn

Dining Room High: $1680 | Dining Room Low: $510

It is a huge breath of fresh air to see the savings and know that having a photo-ready room doesn’t mean you will have to sit in your gorgeous new dining room living off of bread and water for the next year. I was lucky to come across these finds in the early part of my decorating, but don’t be afraid to take your time. Don’t settle for pieces you’re not in love with. Also, keep in mind the best part about places like TJ Maxx/Home Goods/Marshalls and Overstock are their great return policies. You can pretty much return anything for store credit, so don’t be afraid to buy it to test it out. For a while, I had an entire closet of “maybe” items. I eventually found other places for many of them, but for the rest I’ll quote the blind side and say – if you don’t absolutely love it in the store, you won’t “wear” it.

Happy hunting, readers!

Recipe for a Happy Home

Take love and loyalty, mix it thoroughly with faith. Blend it with tenderness, kindness and understanding. Add friendship and hope. Sprinkle abundantly with laughter. Bake it with sunshine. Serve generous helpings daily. – Unknown
After
The kitchen was going to be the most important room for me. So when I saw what I had to work with, I knew there was going to be a lot of designing to be done. (*Updated 2.4.15 with a better photo of the wall we took down, but after the seller moved out)
Before 2
Needless to say, out came the measuring tape. Even after measuring, I wasn’t sure what I could do with the space, so I knew just visualizing and having the measurements wasn’t going to cut it. I needed to see this on paper. The wall needed to come down,  I didn’t need an eat in kitchen, but I did need prep & storage space – a lot of it. With concerns of what taking down the entire wall would do to the floors (and my budget) I compromised with this brainstorm doodle:
Some people are really intimidated by the idea of building an island, but in reality it is just a bunch of base cabinets with your choice of countertop. I knew I could salvage the rest of the cabinet s- they were sold wood, in good shape, and even had sliding shelves in all of them. Knowing matching the cabinet style and paint would mean I had to go custom, I opted for the fortunately-in-style trend of a contrasting color for my island. Which also led me to the option of Ikea kitchen cabinets. I know many people turn their nose at this thought, but here’s the truth about custom cabinets: Even custom cabinets are modular. In this modern culture of the internet and renovating, you can pretty much get a modular cabinet in any size. Yes, Ikea may not be 100% wood, but the doors are solid wood, and the rest is incredibly durable. I looked into a lot of different modular cabinet brands, and Ikea really beat everyone in reviews, price, and time. We picked them up at the store and had the crew put them together the next day.
As a Realtor in North Jersey, I see these cabinets widely used in luxury buildings throughout Jersey City and Hoboken, especially to enhance the otherwise small spaces.  They typically hide behind granite and hardware from somewhere else- this is the secret to dressing up these budget friendly cabinets – buy your finishes elsewhere. In any given area, you can find a granite slab distributor who will cut, deliver, and install. They will even give you sample pieces to help in your design and it will beat the quality of any big box store who outsources to a third party, which means you are paying twice the markup. The distributors also have leftover slabs from special orders which means, if you’re lucky, you get to pay $30/sq ft for what that high end designer needed at $50/sq ft.
Stove Fridge
As mentioned in the dining room post from last week, seeing messy prep work from the dining table is a pet peeve of mine. WIth this in mind, I designed the second tier to not only hide the mess, but perfectly cover the small appliances when you are looking in. (If you are using stools, still keep in mind there is a standard clearance between stool top to countertop!) Originally, I had planned to break up the tiers with the same backsplash tile, but there was not much granite in that strip, so it was not worth the minimal cost savings in the long run. I managed to find these simple pulls that were nearly identical to the original cabinets, creating a seamless feel.
Though it was a large (unplanned) expense, we upgraded all the appliances to stainless steel, which almost instantly modernizes a kitchen. An important tip when shopping for appliances is to know that big box stores will price match. In fact, Home Depot has a meet it and beat it policy for major competitors- which basically means if you see it at Lowe’s or Sears for cheaper, they will match it and give you 10% off on top. Thanks to labor day sales and a few calls to Customer Service, our dishwasher was essentially free.
Cabinets Sink
One of the most important realities during a renovation is to be realistic about what you can salvage and being ready for the difficulties that choice may bring. I will talk more about this in my main bath post, but sometimes opting to salvage can cost you more in the long run. We were fortunate enough that the only problem with the cabinets were that they were too low, so we actually had them raised 4 inches to meet standards. We also chose to keep the faucet since it had everything we needed.. Also, it’s not difficult to change out sink hardware as long as you use standard dimensions.
Nespresso
In design, you also have to weigh the benefits of customization; meaning, will what is custom to me work for someone else? As tempting as it is to design to your taste, you may pay the price for it if you ever decide to sell and a buyer wants you to pay for removing it. I have always been one for a simple background, so I chose a basic matte subway tile in an almond. Nothing offensive about beige, and there’s room to add color in other ways, like small appliances and kitchen storage. In fact, I have gotten more compliments on this simple backsplash than I have the granite!
Nemo
With that said, you should not sacrifice your everyday conveniences worrying about that dollar floating somewhere in the future. The only guarantee you have is the happiness of waking up in a home you love today. Like I’ve said before, a home means something for everyone, so I had Nemo in mind for almost every room. I added pull out cabinets on both sides, which allowed me to create this doggy corner for his food and water bowls along with food and snack storage. It also created a deeper countertop, which means a win-win.
For this kitchen overhaul, we took down half a wall, built a two tier breakfast bar/island, replaced countertops with granite, replaced sink and all appliances, ran the waterlines to accommodate the new fridge with water dispenser, replaced the tile backsplash, moved the cabinets further up the wall, installed an exhaust, and bough tall new appliances. The total budget was $6000 for the kitchen AND dining room. With the decision to replace all appliances, as opposed to only the fridge and dishwasher, we came in at about $5000 for labor/materials, plus about $2500 toward appliances. This was over the typical 20% overage I plan for in a budget, BUT had we stuck with our original plans we would have been on budget at the expense of not being as happy with the results.
Fortunately, we took the leap of faith and now not only carry all ingredients for a happy home, but have plenty of room to enjoy recipes of all kinds. Thanks for reading and check back in next week for my post on our main bath!
P.S. I managed to sell some of our old appliances on Craigslist, which also offset costs of new appliances significantly.

Following The Golden Rule: Eat, drink, and be merry!

Wait, or is it something about how to treat others? Oh well, I say treat others to food, drinks, and happiness!

After

In our home search, one of the most important spaces to me was the dining room, which came in just behind the kitchen. It’s not to say i’m some gourmet chef, but I do love cooking and entertaining. I also needed a space to finally display all the serveware from our wedding registry that was collecting dust in my parents’ attic. Measurements were key – I was looking to seat 6-8 people and ideally a sideboard. When I saw what I had to work with, I took out the measuring tape, because while renovation can open up many doors, they certainly do come with limits – like the walls.

Before

After taking measurements, I realized it was the furniture that was limiting my perception of space. It was not a large space, but it was big enough. Still, if I wanted the space I was looking for, I would have to take a wall down–well, at least half of one. So, I took down half the wall between the kitchen and dining room, designing a two-tier island (next week’s post!) creating a bar-height counter to replace the need for a sideboard. This also solved the problem of seeing a mess on the kitchen counter once dinner is served (one of my biggest pet peeves!).

We painted throughout, added crown moulding and used the already present chair rail to incorporate wainscoting throughout the room. The biggest surprise in this room was that the chair rail and floor moulding behind the monstrous china cabinet was actually missing, which is somewhat common for homes of this age since china cabinets were in style. To save cost, I went from store to store trying to match the exact piece. It took some work and even several kind strangers’ help to finally find the missing piece, but for $7 my problem was solved. The renovation in this room was a minimal cost, since it was mostly bundled with the kitchen, so I’ll share it with next week’s post.

Details 2

I designed this space around a thick, contemporary black wood table. Fortunately, the in-laws also had this treasure in their collection of stored items. I chose armless upholstered chairs with nailhead accents I found on Overstock, to soften up the heavy dark wood and fit comfortably in the less-than-large space. In the same order, I added a pair of saddle seat stools to sit under the bar for extra seating, but also to bring more black wood into the space. As much as I would have loved to have an upholstered high back bar chair, it was too large for the space, which is a good reminder to always measure and be honest about what will work for your space. Sometimes less is more, sometimes more is more – you just have to be the judge of that!

In all the fun of decorating, lighting fixtures can often get left behind. Believe it or not, Home Depot has a great selection from traditional to modern. It may not be extensive, but there is something for everyone and is incredibly budget-friendly. Mirrors are also a great way to add light to a room and open up a space. This gorgeous mirror was a steal at Home Goods at just $80, and helped create the same effect as a window. I chose these lattice curtains at TJ Maxx to add pattern to what could be a very dark gray space. With any color choice, it’s important to know how to complement with other colors and patterns so it doesn’t take over the space.

Details

All in all, this room involved a lot of risks. I literally had walls torn down to create it, and I could not be happier with the results. I now have a comfortable, yet luxurious, feeling space not only to entertain, but to serve dinner on a daily basis. It also encourages me to cook more and eat out less, which is just another step in healthy, happy living. This was the greatest lesson in renovating: The investment you make is not only about getting a return on your money, but the return of happiness you get in waking up in a space you love.

Leave all that is bad in 2014. Bring all that is good into 2015…

After

…even if that includes the christmas tree. Just kidding! That’s coming down tonight.

It’s the time of year again – new year, new you. This past year, I embarked on a journey I’ve been dreaming of through many a Pinterest board and hours of HGTV: remodeling. Now I get to appreciate the results of my design and hard work; most importantly, share it with all of you. The miracle of a fresh coat of paint can only be likened to waking up on New Year’s day, refreshed and ready for new memories.

For months, I vigorously showed up at every 3 bedroom/2 bath that came on the market. As a Realtor, I reminded myself of the emotional roller coaster I often remind buyers of. But sure enough, the emotions still got to me, especially after losing a bidding war. Like many great things in life, as I was beginning to believe it was hopeless, I walked into this modest split level home, where a nice woman answered the door, sharing with me that she had 37 years of memories in this very living room.

before

It wasn’t much at first sight – definitely not love – but I knew then it could become the very home my husband and I would continue our lives together, as long as we could turn it into our own. When he first saw it, he grew nervous, recalling the renovation nightmares we’d seen on television. But something about the house felt right, and like with any important decision, you can’t deny your gut.

So we set out with a $20,000 budget and 3-week timeline to finish all of our interior renovations (not including decor). We found a labor-only crew, where we supplied the materials, and got to work. I spent a lot of time measuring, sketching plans, and studying paint swatches. The living room required the least renovations, but the most attention, in terms of decor. Renovations included a fresh coat of paint, crown moulding, and recessed lighting. Because the majority of these costs were bundled with other work throughout the house, it came in under $1,000. From there, it was just about the details.

Details

Because we didn’t have much furniture from our small space before, I spent a lot of time adding and removing furniture to my wishlist on overstock.com and driving back and forth between Home Goods, TJ Maxx and Marshalls. My in-laws also came in handy with some items they’ve collected in storage over the year. We were able to repurpose a lightly used (free) couch from them, by adding colorful throw pillows that came in under $150 at TJ Maxx. I also managed to save on the artwork above the sofa thanks to ikea’s budget-friendly frames and this creative pin.

Chairs Table

For days, I had oversized packages showing up outside my garage, including all of the tables and chairs. It even required some returns. Let me just say re-packing an 8×10 ft area rug, then dropping it off at FedEx was a several hour job in itself…for TWO of us!

Toys

The most important thing about making this living room ours was to make sure there was something for everyone, so how could I forget this little guy, Nemo. I needed to give him access to his toys without letting the house be over run by this 13-pound pooch, so I put them in a small canvas basket to hide behind this moroccan stool I had my eye on at Home Goods – plus, I finally had an excuse to buy it!

We ended up completing the interior renovation slightly over budget, but within the estimated time frame. It was stressful at times, and we did encounter a few speed bumps, but it has been one of the most rewarding experiences. On a (semi) weekly basis, I will be posting more features from our renovation, so I hope you can enjoy the results as much as I have. Happy new year, everyone – Wishing you all new memories this 2015!

You can also connect with me @JennChanRealtor: